


Processing images fast with native code in Android
- Introduction
- Example problem statement: YUV to RGB conversion
- Image processing with Native Code
- Performance
- Closing notes
Introduction
Performance is a feature for most of the software products out there, but there are few programs which are more performance sensitive than the others. I work on an Android Camera App and my team gives very high priority to performance.
[Google found that] the page with 10 results took 0.4 seconds to generate. The page with 30 results took 0.9 seconds. Half a second delay caused a 20% drop in traffic. Half a second delay killed user satisfaction.
I don’t need to oversell the importance of performance to my manager or to you, but I came across this snippet which strengthens the performance is a feature construct - it’s a good to know fact.
If you are writing applications that processes large images captured with a camera or an existing image on the device you need to be extra careful. These days camera on phones are easily equipped with high resolution sensors. It’s easy to find 13MP (Mega Pixels), 24MP, 48MP or even 108MP cameras now being shipped on Android devices.
Let’s look at a 13MP image. It has 13,000,000 pixels. If you wanted to do just one simple computation on the image let’s say increase the exposure of the image i.e. for every pixel
image(x, y) = std::clamp(alpha * image(x, y) + beta, 0, 255);
You need to do 13 million times.
The smartphones these days are also equipped with multicore, SIMD supported CPUs, so there are ways to do it faster than serialized 13 million iterations but at the same time the types of algorithms we want to run are usually much more complex than the one I just stated.
In my experience, its both easier and better to handle these complex image processing operations with native code very particularly to keep it performant.
This is a very basic article demonstrating how to do image processing with native code in Android. I’ll also show by an example that the performance of a very simple and unoptimized C++ code comes very close to fairly optimized Java code for the same problem statement. If you are looking for “Fast image processing using Java Native Interface or JNI in Android” - I believe you have come to the right place, this article will help you the same.
Example problem statement: YUV to RGB conversion
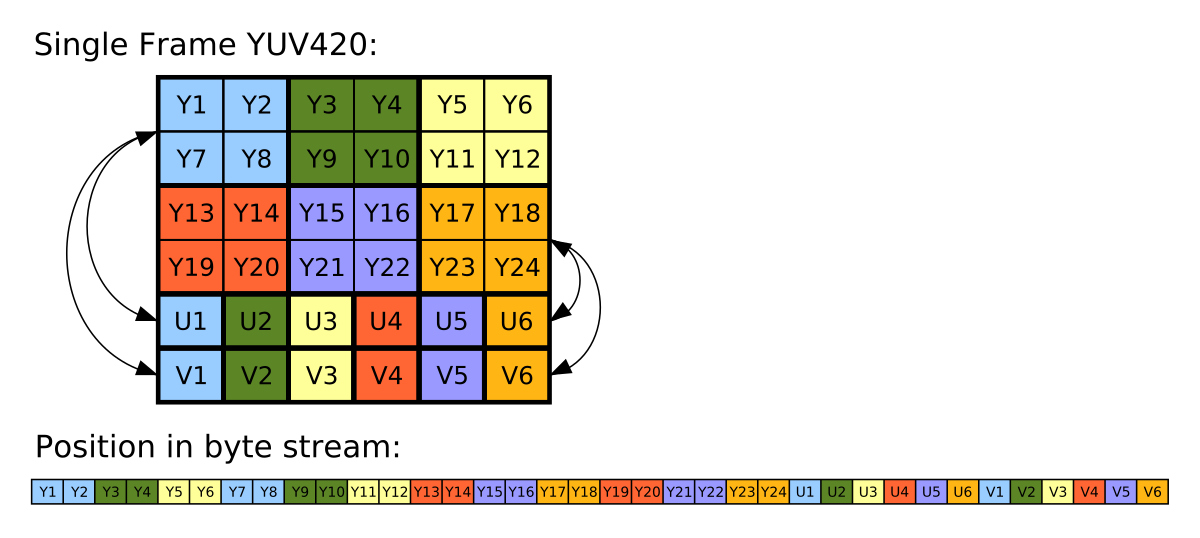
The problem statement is to convert an 8MP (3264x2448) image in a certain format called YUV_420_888 which has one planar Y channel and two semi-planar subsampled UV channels to ARGB_8888 format which is commonly supported with Bitmap in Android. You can read more about YUV format on Wikipedia. Also, the articles below have better description of the problem statement.
The reason I chose this as the problem statement, is because YUV_420_888 is one of the most common OUTPUT format supported from Android Camera APIs and images are commonly consumed as Bitmap in Android - thus making this a fairly common problem statement to address.
I have been experimenting with performance of different frameworks or technologies to understand performance of image processing in Android taking this as the problem statement. Here are some examples of the same using other techniques I have tested:
How to use RenderScript to convert YUV_420_888 YUV Image to Bitmap
 RenderScript turns out to be one of the best APIs for running computationally-intensive code on the CPU or GPU (that too, without having to make use of the NDK or GPU-specific APIs). In this code I have explained how to use ScriptIntrinsicYuvToRGB intrinsic that is available in Android APIs to convert an android.media.Image in YUV_420_888 format to Bitmap.
[.. Read& more ]
RenderScript turns out to be one of the best APIs for running computationally-intensive code on the CPU or GPU (that too, without having to make use of the NDK or GPU-specific APIs). In this code I have explained how to use ScriptIntrinsicYuvToRGB intrinsic that is available in Android APIs to convert an android.media.Image in YUV_420_888 format to Bitmap.
[.. Read& more ]
Faster image processing in Android Java using multi threading
 While I was exploring different ways to do efficient image processing in Android I realized that a simple two-dimensional for-loop when written in Java vs C++ could have very different performance. For example: I have been comparing different ways we
[.. Read& more ]
While I was exploring different ways to do efficient image processing in Android I realized that a simple two-dimensional for-loop when written in Java vs C++ could have very different performance. For example: I have been comparing different ways we
[.. Read& more ]
I plan to write a full series article that explains performance of different approaches. Here are the numbers for the approaches published so far:
| Approach | Average | Notes |
|---|---|---|
| Java | 353 ms | 11.2x slower |
| Java multithreaded | 53.8 ms | 1.7x slower |
| RenderScript | 31.5 ms | fastest among these |
Table 1: Performance latency of converting a 8MP (3264x2448) YUV Image to Bitmap on Pixel 4a device.
Image processing with Native Code
If we were operating in the native space directly the basic skeleton program would look like this
struct RGBA_8888 {
  uint8_t r;
  uint8_t g;
  uint8_t b;
  uint8_t a = 255;
};

RGBA_8888 yuv2rgb(uint8_t y, uint8_t u, uint8_t v) {
    int r = y + (1.370705 * (v - 128));
    int g = y - (0.698001 * (v - 128)) - (0.337633 * (u - 128));;
    int b = y + (1.732446 * (u - 128));
    r = clamp(r, 0, 255);
    g = clamp(g, 0, 255);
    b = clamp(b, 0, 255);
    return {.r = r, ,g = g, .b = b};
}
The function takes y, u and v channel value for a certain pixel and returns the corresponding RGBA_8888 value.
Android programs are by default written in Java or Kotlin language, but Android tool chains come with a Native Development Kit called Android NDK that lets you implement sections of your app using languages such as C and C++. Android documentation describe NDK to be useful for two scenarios:
Squeeze extra performance out of a device to achieve low latency or run computationally intensive applications, such as games or physics simulations.
Reuse your own or other developers’ C or C++ libraries.
In next few sections I’ll try to explain in brief how to convert a Java Image in YUV_420_888 format to Java object Bitmap using native code integration.
So basically we have to fill in this skeleton Java function
  Bitmap toBitmap(Image image) {
    if (image.getFormat() != ImageFormat.YUV_420_888) {
      throw new IllegalArgumentException("Invalid image format");
    }

    // Do some magic here
    throw new Exception("Not yet implemented");
  }
Before I go deeper I’d like to introduce you to JNI.
JNI
JNI stands for Java Native Interface. It defines a way byte code compiled from Java or Kotlin code to interact with native code written in C or C++. As the name says it helps us interface the Java code with the native code.
If you end up working more with JNI, I’d recommend reading Android’s tips on JNI - JNI tips.
Getting Started with NDK & JNI
To avoid redundancy I’d recommend checking out and trying the following articles to set up your first JNI based Android App. These articles will also help you set up the required tool chains for compiling Android Apps along with NDK & native code.
Let me know over comments if these articles are not clear enough. Please proceed to next section if you have successfully created and run your JNI app or are already aware of the constructs.
Native code for YUV to Bitmap conversion
Create a library and source fileyuv2rgb.h/cc in app/src/main/cpp.
Header file
// yuv2rgb.h

namespace MyProject {

// Converts the YUV image with the given properties to ARGB image and write to
// `argb_output` destination.
void Yuv2Rgb(int width, int height, const uint8_t* y_buffer, const uint8_t* u_buffer,
            const uint8_t* v_buffer, int y_pixel_stride, int uv_pixel_stride,
            int y_row_stride, int uv_row_stride, int* argb_output);

}
Source file
// yuv2rgb.cc

#include "yuv2rgb.h"

namespace MyProject {

void Yuv2Rgb(int width, int height, const uint8_t* y_buffer, const uint8_t* u_buffer,
            const uint8_t* v_buffer, int y_pixel_stride, int uv_pixel_stride,
            int y_row_stride, int uv_row_stride, int* argb_output) {
  uint32_t a = (255u << 24);
  uint8_t r, g, b;
  int16_t y_val, u_val, v_val;

  for (int y = 0; y < height; ++y) {
    for (int x = 0; x < width; ++x) {
      // Y plane should have positive values belonging to [0...255]
      int y_idx = (y * y_row_stride) + (x * y_pixel_stride);
      y_val = static_cast<int16_t>(y_buffer[y_idx]);

      int uvx = x / 2;
      int uvy = y / 2;
      // U/V Values are sub-sampled i.e. each pixel in U/V channel in a
      // YUV_420 image act as chroma value for 4 neighbouring pixels
      int uv_idx = (uvy * uv_row_stride) +  (uvx * uv_pixel_stride);

      u_val = static_cast<int16_t>(u_buffer[uv_idx]) - 128;
      v_val = static_cast<int16_t>(v_buffer[uv_idx]) - 128;

      // Compute RGB values per formula above.
      r = y_val + 1.370705f * v_val;
      g = y_val - (0.698001f * v_val) - (0.337633f * u_val);
      b = y_val + 1.732446f * u_val;

      int argb_idx = y * width + x;
      argb_output[argb_idx] = a | r << 16 | g << 8 | b;
    }
  }
}

}
Ideally you should also write a unit test for this, but that is out of scope of this article. You can read more about adding Native Tests in Android documentation.
Next we will write a JNI layer to connect it with our Java skeleton we started with.
Java + JNI integration
Now you need to have a JNI file to connect the Java library to Native library. Let’s add yuv2rgb-jni.cc in app/src/main/cpp.
Also, let’s assume our Java skeleton function is in package com.example.myproject and under a static class called YuvConvertor, your JNI file should look like this.
Important Note: The package name, class name and native method name are important here as they are used by the runtime to call the right native function. See the method name in the JNI code below to get more context.
// yuv2rgb-jni.cc
#include <jni.h>
#include <android/log.h>

#include "yuv2rgb.h"

extern "C" {

jboolean
Java_com_example_myproject_YuvConvertor_yuv420toArgbNative(
  JNIEnv* env, jclass clazz, jint width, jint height, jobject y_byte_buffer,
    jobject u_byte_buffer, jobject v_byte_buffer, jint y_pixel_stride,
    jint uv_pixel_stride, jint y_row_stride, jint uv_row_stride,
    jintArray argb_array) {
  auto y_buffer = reinterpret_cast<uint8_t*>(env->GetDirectBufferAddress(y_byte_buffer));
  auto u_buffer = reinterpret_cast<uint8_t*>(env->GetDirectBufferAddress(u_byte_buffer));
  auto v_buffer = reinterpret_cast<uint8_t*>(env->GetDirectBufferAddress(v_byte_buffer));
  jint* argb_result_array = env->GetIntArrayElements(argb_array, nullptr);
  if (argb_result_array == nullptr || y_buffer == nullptr || u_buffer == nullptr
      || v_buffer == nullptr) {
    __android_log_print(ANDROID_LOG_ERROR, PRIVATE_TAG,
                        "[yuv420toArgbNative] One or more inputs are null.");
    return false;
  }

  Yuv2Rgb(width, height, reinterpret_cast<const uint8_t*>(y_buffer),
                   reinterpret_cast<const uint8_t*>(u_buffer),
                   reinterpret_cast<const uint8_t*>(v_buffer),
                   y_pixel_stride, uv_pixel_stride, y_row_stride, uv_row_stride,
                   argb_result_array);
  return true;
}

}
And finally call this from the Java library
// YuvConvertor.java

package com.example.myproject;

import android.graphics.Bitmap;
import android.graphics.Bitmap.Config;
import android.graphics.ImageFormat;
import android.media.Image;

public class YuvConvertor {
  private YuvConvertor() {}

  static {
    // define this in CMakeLists.txt file.
    System.loadLibrary("yuv2rgb-lib");
  }

  public Bitmap toBitmap(Image image) throws Exception {
    if (image.getFormat() != ImageFormat.YUV_420_888) {
      throw new IllegalArgumentException("Invalid image format");
    }

    int[] argbOutput = new int[image.getWidth() * image.getHeight()];
    if (!yuv420toArgbNative(
      image.getWidth(),
      image.getHeight(),
      image.getPlanes()[0].getBuffer(),       // Y buffer
      image.getPlanes()[1].getBuffer(),       // U buffer
      image.getPlanes()[2].getBuffer(),       // V buffer
      image.getPlanes()[0].getPixelStride(),  // Y pixel stride
      image.getPlanes()[1].getPixelStride(),  // U/V pixel stride
      image.getPlanes()[0].getRowStride(),    // Y row stride
      image.getPlanes()[1].getRowStride(),    // U/V row stride
      argbOutput)) {
      // Handle this based on your usecase.
      throw new Exception("Failed to convert YUV to Bitmap");
    }
    return Bitmap.createBitmap(
      argbOutput, image.getWidth(), image.getHeight(), Config.ARGB_8888);
  }

  private static native boolean yuv420toArgbNative(
    int width,
    int height,
    ByteBuffer yByteBuffer,
    ByteBuffer uByteBuffer,
    ByteBuffer vByteBuffer,
    int yPixelStride,
    int uvPixelStride,
    int yRowStride,
    int uvRowStride,
    int[] argbOutput);
}
Some important points to note here are:
- Using NDK APIs we can directly access the content of a ByteBuffer in native code which is both super useful and dangerous if not handled correctly.
- There are NDK APIs for Bitmap which can be directly used in this case which can help reduce additional memory allocation, we can directly update the Bitmap’s memory from the native code.
So with this you have your Java code calling the JNI, which retrieves the pointer to the input and output data in native format and pass it to native library for processing. The native library is fairly common C++ code and can be used outside of Android as well.
Your make file (should be in app/src/main/cpp/CMakeLists.txt in this case) should be properly configured to support the building of native code with the Android APK. For this example it should at least have these definitions.
# Sets the minimum version of CMake required to build the native
# library.
cmake_minimum_required(VERSION 3.4.1)

set(CMAKE_CXX_FLAGS "-Wall -Wextra ${CMAKE_CXX_FLAGS}")

find_library(log-lib
             log )

add_library(
        yuv2rgb-lib
        SHARED
        yuv2rgb-jni.cc
        yuv2rgb.cc)

target_link_libraries( # Specifies the target library.
        yuv2rgb-lib
        -O3
        # Links the target library to the log library included in the NDK.
        ${log-lib} )

include(AndroidNdkModules)
Performance
When looking at performance, please bear in mind that this is fairly simple form of C++ code, it doesn’t explicitly take advantage of multi-threading or SIMD instruction sets that can run on the Android devices. At best some portion of the code gets optimized by the compiler (for example the main for loop could get auto-vectorized). The code was compiled with -O3 optimization flag.
For an 8MP image (3264x2448) this code takes about 76.4ms on the same reference device.
| Approach | Average | Notes |
|---|---|---|
| Java | 353 ms | 11.2x slower |
| Java multi-threaded | 53.8 ms | 1.7x slower |
| RenderScript | 31.5 ms | fastest among these |
| Native code | 76.4 ms | One in this article |
Table 2: Performance latency of converting a 8MP (3264x2448) YUV Image to Bitmap on Pixel 4a device.
You can see here that the performance of this version of the native code is 1.4x slower than the very optimized multithreaded Java code, which isn’t bad news. The starter Java code took 353 ms to run the same algorithm (although it likely has reasons around the complex ByteBuffer not giving direct array access - read more). To learn more about writing more optimized native code or take advantage of the compiler to language constructs I’d recommend reading this article
Guide C++ compiler to auto vectorise the code
 C++ compilers these days have code optimization techniques like loop vectorizer which allows the compilers to generate vector instructions for code written in scalar format. It also depends on how the code is written for the compiler to understand if it can auto-vectorize the code or not. In this article I'll be sharing some ways for developers to guide the compiler to auto-vectorize a certain for loop in C++. It may not necessarily work for all compilers. The examples here are borrowed from ARM's documentation and applies to following compilers that can generate Neon code like GCC, LLVM-Clang, Arm C/C++ compiler and more. I got nearly 18% speedup with simple tricks.
[.. Read& more ]
C++ compilers these days have code optimization techniques like loop vectorizer which allows the compilers to generate vector instructions for code written in scalar format. It also depends on how the code is written for the compiler to understand if it can auto-vectorize the code or not. In this article I'll be sharing some ways for developers to guide the compiler to auto-vectorize a certain for loop in C++. It may not necessarily work for all compilers. The examples here are borrowed from ARM's documentation and applies to following compilers that can generate Neon code like GCC, LLVM-Clang, Arm C/C++ compiler and more. I got nearly 18% speedup with simple tricks.
[.. Read& more ]
Closing notes
I’d re-assert that native code has been great for running computationally intensive algorithms on Android. And most of the image processing algorithms usually fall under this category likely due to the need to process large number of pixels and hence large number of iterations.
In this same series of experiments, by taking advantage of multi threading, NEON APIs (SIMD) and some assembly code I was able to get the latency down to 12.1 ms which is the winner in this series (Spoiler alert). It’s however, fairly complicated to both write and maintain and a Halide based solution which takes about 28ms for the same problem statement is even perfect solution in terms of performance, maintenance and ease of writing.
I’ll be writing about both of these in my next set of articles, thanks for reading. Stay tuned!!
Want to read more such similar contents?
I like to write articles on topic less covered on internet. They revolve around writing fast algorithms, image processing as well as general software engineering.
I publish many of them on Medium.
If you are already on medium - Please join 4200+ other members and Subscribe to my articles to get updates as I publish.
If you are not on Medium - Medium has millions of amazing articles from 100K+ authors. To get access to those, please join using my referral link. This will give you access to all the benefits of Medium and Medium shall pay me a piece to support my writing!
Thanks!