Fast and maintainable image processing in Android with Halide - Part 3
- Introduction
- Problem statement: YUV to RGB conversion
- Halide code for YUV to ARGB generation
- Wrapping this Halide generated method with Android
- Conclusions
- References
Introduction
Halide is an open-source domain specific language designed to make it easier to write and maintain high-performance image processing or array processing code on modern machines.
I have been writing a series on Halide and this article is 3rd one in the series. In the last two articles I talked about:
- Part 2 - Understanding the General Concepts of Halide Programming Language
- Part 1 - Writing Fast and Maintainable Code With Halide —The Pilot Episode
In this article I will be writing about how to use Halide with Android. To show the performance benefits I am going to reuse the problem statement of YUV to RGB colour format conversion. I have written couple of articles in the past showing different ways to do image processing in Android with this example using this example.
Important Disclaimer: Any opinion called out in this article are my own and don’t reflect opinion or stance of the organisations I work with.
Problem statement: YUV to RGB conversion
If you are purely interested in learning how to use Halide with Android, you can skip this sub-section.
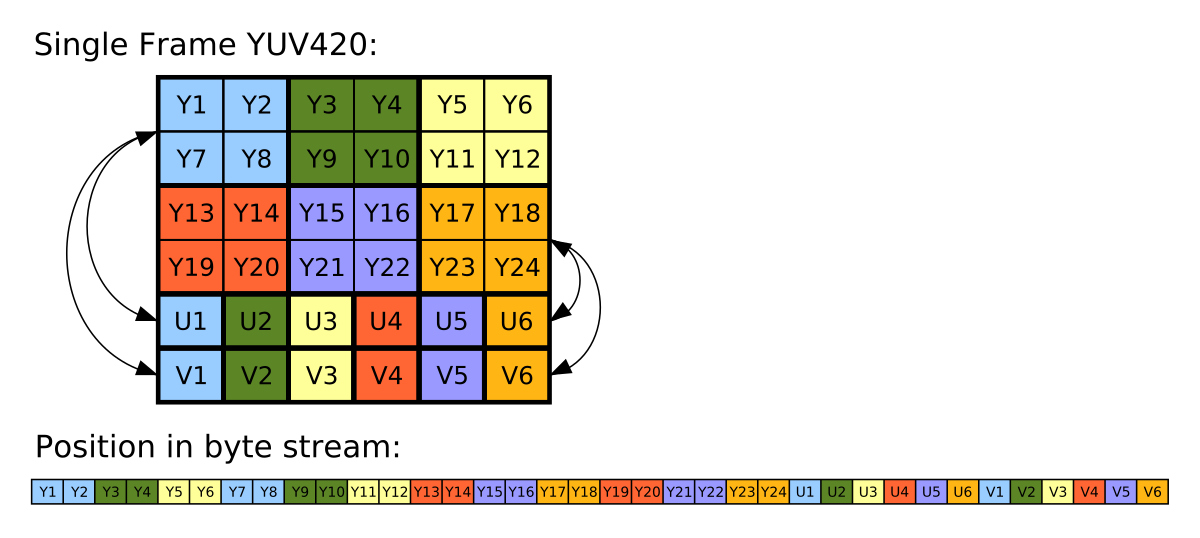
The problem statement is to convert an 8MP (3264x2448) image in a certain format called YUV_420_888 which has one planar Y channel and two semi-planar subsampled UV channels to ARGB_8888 format which is commonly supported with Bitmap in Android. You can read more about YUV format on Wikipedia. Also, the articles below have a better description of the problem statement.
The reason I chose this as the problem statement, is because YUV_420_888 is one of the most common OUTPUT formats supported from Android Camera APIs and images are commonly consumed as Bitmap in Android - thus making this a fairly common problem statement to address.
I have been experimenting with performance of different frameworks or technologies to understand performance of image processing in Android taking this as the problem statement. Here are some examples of the same using other techniques I have tested:
Processing images fast with native code in Android
 In my experience, its both easier and better to handle these complex image processing operations with native code very particularly to keep it performant. This is a very basic article demonstrating how to do image processing with native code in Android. I'll also show by an example that the performance of a very simple and unoptimized C++ code comes very close to fairly optimized Java code for the same problem statement.
[.. Read& more ]
How to use RenderScript to convert YUV_420_888 YUV Image to Bitmap
 RenderScript turns out to be one of the best APIs for running computationally-intensive code on the CPU or GPU (that too, without having to make use of the NDK or GPU-specific APIs). In this code I have explained how to use ScriptIntrinsicYuvToRGB intrinsic that is available in Android APIs to convert an android.media.Image in YUV_420_888 format to Bitmap.
[.. Read& more ]
Faster image processing in Android Java using multi threading
 While I was exploring different ways to do efficient image processing in Android I realized that a simple two-dimensional for-loop when written in Java vs C++ could have very different performance. For example: I have been comparing different ways we
[.. Read& more ]
I have recorded following numbers for the problem statement with different solutions listed above by running them on a Pixel 4A device.
| Approach | Average | Notes |
|---|---|---|
| Java default | 353 ms | 11.2x slower |
| Java multi-threaded | 53.8 ms | 1.7x slower |
| RenderScript | 31.5 ms | fastest so far |
| Native code | 76.4 ms | 2.42x slower |
| Native code with pragma directives | 64.5 ms | 2.04x slower |
So far, the RenderScript based approach was observed to be the fastest. However, RenderScript has been deprecated starting Android 12. You can read more about it here. The development team has shared some alternatives which are expected to be much more performant on new hardware.
In this article, I’ll share the Halide based solution for this problem and then look at the performance numbers of Halide based solution.
Halide code for YUV to ARGB generation
As mentioned in the previous article, Halide allows us to separate the algorithm from schedule. So first let’s look at the algorithm for YUV to RGB conversion.
In this case we shall assume that the input image format is YUV_420_888. Some key aspects of this image format are
- Luma channel (Y channel) is full resolution and planar. It means Y-plane is guaranteed not to be interleaved with the U/V plane.
- Chroma channel (UV channel) is subsampled and can be interleaved.
- By subsampled it means there is one UV pixel for four Y pixels.
- By interleaved it means the UV data can be packed in
UVUVUVUVUVUVpattern in the memory for each row of the image.
In the examples so far, the ARGB outputs were has each channel (R or G or B or A = alpha) with uint8 data stored in single int32 value. We’d continue to do the same.
The algorithm
The Halide generator may look something like this.
#include "Halide.h"

using namespace Halide;

namespace {

class Yuv2Rgb : public ::Halide::Generator<Yuv2Rgb> {
 public:
  // NV12 has UVUVUVUV packaging and NV21 has VUVUVUVU packaging.
  GeneratorParam<bool> is_nv_12_{"is_nv_12_", true};

  Input<Buffer<uint8_t, 2>> luma_{"luma_"};
  Input<Buffer<uint8_t, 3>> chroma_subsampled_{"chroma_subsampled_"};

  Output<Buffer<uint32_t, 2>> argb_output_{"argb_output_"};

  void generate() {
    Var x("x"), y("y"), c("c");

    // Define UV input as interleaved (assumed planar by default).
    chroma_subsampled_.dim(0).set_stride(2);
    chroma_subsampled_.dim(2).set_stride(1);
    chroma_subsampled_.dim(2).set_bounds(0, 2);

    // Algorithm
    Func uv_centered("uv_centered");
    uv_centered(x, y, c) =
        Halide::absd(i16(chroma_subsampled_(x / 2, y / 2, c)), i16(127));

    Func u("u");
    u(x, y) = uv_centered(x, y, is_nv_12_ ? 0 : 1);

    Func v("v");
    v(x, y) = uv_centered(x, y, is_nv_12_ ? 1 : 0);

    Expr r = u32(luma_(x, y) + 1.370705f * v(x, y));
    Expr g = u32(luma_(x, y) - (0.698001f * v(x, y)) - (0.337633f * u(x, y)));
    Expr b = u32(luma_(x, y) + 1.732446f * u(x, y));
    Expr alpha = (u32(255) << 24);
    argb_output_(x, y) = alpha | r << 16 | g << 8 | b;

    // TODO(mebjas): Write optimised schedule.
    argb_output_.compute_root();
  }
};

}  // namspace

HALIDE_REGISTER_GENERATOR(Yuv2Rgb, Yuv2RgbHalide)
Schedules
In Halide if we do not write any explicit schedule, everything is computed inline. Writing schedule often involve expertise with Halide, the target hardware and some level of hit and trial. IMO, the first step should always be to write benchmarks and run it on target hardware. You can use the open source benchmarking framework at google/benchmark for this purpose.
Let’s start with the very first schedule
Default schedule
argb_output_.compute_root();
This will do all the compute inline i.e. inside the two for-loops for each pixel.
Running it on Pixel 4A, I get following results for the above mentioned generator.
| Schedule | Benchmark results | Notes |
|---|---|---|
| Default schedule | 62.3 ms |
This is not very good! We can definitely do better.
Split, parallelise and vectorise
To learn more about these primitives you can the article 2 in this series - Understanding the General Concepts of Halide Programming Language.
// Schedule.
Var xi("xi"), yi("yi");
argb_output_.compute_root()
    .split(y, y, yi, 64)
    .split(x, x, xi, 32)
    .vectorize(xi, natural_vector_size<uint8_t>())
    .reorder(xi, x, y)
    .parallel(y);
This schedule splits the loop into further parts, vectorise the instructions in xi loop and parallelise y loop. Let’s look at the benchmark results
| Schedule | Benchmark results | Notes |
|---|---|---|
| Default schedule | 62.3 ms | |
| Split + Parallelise + Vectorise | 5.01 ms |
Boom! Do you see the crazy speedup over the default schedule?
There may be further optimisations possible like reducing the number of time uv_centered is computed or trying different split factor but it looks good so far.
Wrapping this Halide generated method with Android
The above stated generator will generate a C++ method definition like this
int Yuv2RgbHalide(
  const halide_buffer_t& luma_,
  const halide_buffer_t& chroma_subsampled_,
  halide_buffer_t& argb_output_);
Which can be used directly from c++ library or JNI code.
In future, if needed I will write about how to setup Halide in Android studio and use it end to end. LMK if it would help over comments.
To connect everything together we need to get the whole end to end pipeline connected which means
Java --> JNI --> Halide --> Java --> Bitmap
This leads to an overall latency of ~28ms. So if we look at result of different approaches considered so far
| Approach | Average | Notes |
|---|---|---|
| Java | 353 ms | ~12.6x slower |
| Java multithreaded | 53.8 ms | ~1.9x slower |
| RenderScript | 31.5 ms | ~1.1x slower |
| Native | 76.4 ms | ~2.7 slower |
| Native + some compiler directives | 64.5 ms | ~2.3 slower |
| Halide implementation | 28 ms | New fastest |
This gives us both high performance + easy to maintain code! What else does an engineering team want?
For this problem I have found another solution which is even faster (latency of roughly ~12ms), but requires hardware specific implementation (leveraging NEON intrinsics) and handling parallelisation and all. It’s not as easy to write or maintain but definitely worth an article later.
Conclusions
People who write very efficient code say they spend at least twice as long optimizing code as they spend writing code. – some one on the Internet
Halide makes it much easier to try and tune different schedules. Easier than manually changing loops order, splitting logic, threading etc. And removes the pain for writing & maintaining ABI specific vectorised code.
- Approaches like Halide, Auto vectorised C++ code are portable and easier to maintain.
- As compared to explicitly hand tuned, CPU specific code
- Always, consider your use-case before optimising
- Example - library developer vs app developer
- Understand the real bottlenecks like if the full operation takes 2s, optimising between 28 ms and 12 ms might not give a huge advantage.
- If your application is performance critical
- Benchmark → Breakdown → Optimise
References
Want to read more such similar contents?
I like to write articles on topic less covered on internet. They revolve around writing fast algorithms, image processing as well as general software engineering.
I publish many of them on Medium.
If you are already on medium - Please join 4200+ other members and Subscribe to my articles to get updates as I publish.
If you are not on Medium - Medium has millions of amazing articles from 100K+ authors. To get access to those, please join using my referral link. This will give you access to all the benefits of Medium and Medium shall pay me a piece to support my writing!
Thanks!


